
 Deutsch
Astro Tools / Workflow
How Astro Tools started
A closer look at why I built Astro Tools, how it supports my Photoshop workflow, and which processing steps it helps simplify.
Astro Tools did not start as a classic software idea. It started much more simply: with my own astrophotography workflow.
Over the years, I developed a set of Photoshop techniques that I kept using again and again in my Milky Way and nightscape processing. Star reduction, contrast enhancement, detail work, glow effects, noise reduction and basic tonal adjustments became part of my regular editing routine.
They worked well, but they were also repetitive.
At some point, I realized that I was rebuilding the same kinds of layer structures, masks and adjustments over and over again. Every image was different, of course, but the foundation of the workflow often stayed the same. So I started looking for a way to speed things up without losing control over the final result.
Early workflow
The first step: Photoshop actions
Before Astro Tools became a plugin, the idea started as a Photoshop Action Pack based on the editing steps I used again and again in my own astrophotography workflow.
It was my first attempt to turn repeated processing steps into something faster and more structured — long before Astro Tools became a full Photoshop plugin.
The original Photoshop Action Pack was the first attempt to turn repeated astrophotography processing steps into a faster workflow.
From Manual Photoshop Workflows to Actions
My first step was not a plugin. It was a Photoshop Action Pack.
Photoshop actions are basically recorded sequences of editing steps. They can automate repetitive processes, which makes them useful for workflows that follow a similar structure every time. For astrophotography, this can be very helpful because many processing steps involve a combination of masks, layer copies, blend modes, filters and adjustment layers.
So I started turning some of my most-used techniques into actions. I created actions for star reduction, contrast enhancement, sharpening, Milky Way adjustments and even my own star glow effect, which was built entirely with Photoshop’s internal tools.
That first action pack became my first real astrophotography product. It was simple, but it worked. It helped me speed up my own workflow, and it also gave other photographers a way to use some of the techniques I had developed for my own images.
But after using and selling the action pack for almost a year, I started to see its limitations more clearly.
The Problem With Photoshop Actions
Photoshop actions are powerful, but they are also quite rigid.
Once an action is recorded, it follows a fixed sequence of steps. You can sometimes modify parts of it, but it is not very flexible. If an effect is too strong or too weak, you often need several different action versions, or you have to manually adjust the result afterwards.
For example, with star reduction I created multiple strengths to work around this limitation: one action for a subtle result, one for a medium result and one for a stronger result. The same idea applied to other tools as well.
This worked, but it was not ideal.
Astrophotography images are never exactly the same. A wide-field Milky Way image needs different settings than a deep-sky image. A very clean stacked image behaves differently from a single-exposure nightscape. A bright foreground, a dense star field, thin clouds, light pollution or strong H-alpha regions can all change how an adjustment should be applied.
I wanted something more flexible. Something that kept the speed of actions, but added real control.
First prototype
The idea behind Astro Tools
At some point, I started asking myself a simple question:
What if I could turn my own Photoshop workflow into a real plugin?
I have always been interested in computers and technical workflows. I had some basic experience with HTML, CSS and a little bit of JavaScript from earlier projects, but I was not a traditional software developer. Still, I started researching how Photoshop plugins are built and discovered Adobe’s UXP plugin system.
With UXP, it became possible to start with a Photoshop panel and gradually turn my existing workflow ideas into actual tools.
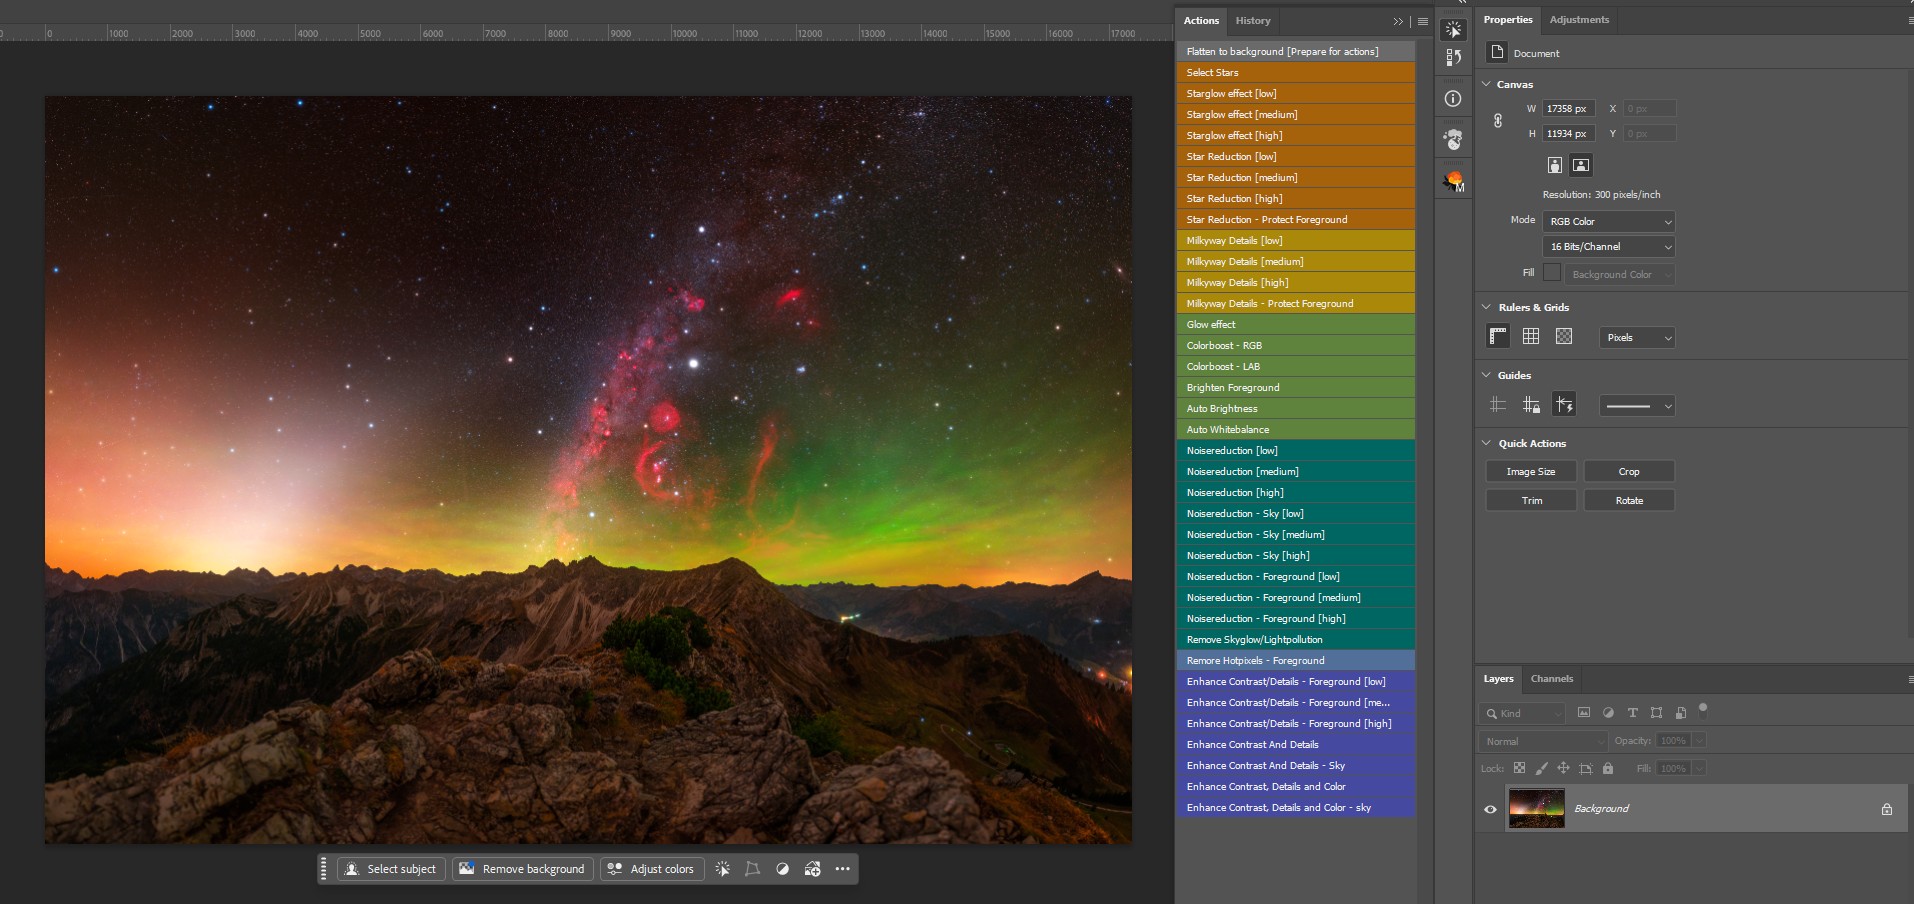
One of the earliest working Astro Tools prototypes — still simple, but already showing the idea of turning fixed actions into adjustable tools.
The first experiments started in November 2025.
At the beginning, everything was very basic. I worked with template plugins, modified them, tested simple commands and slowly built the first prototypes. A big part of the process was translating my existing Photoshop action logic into a more flexible plugin structure.
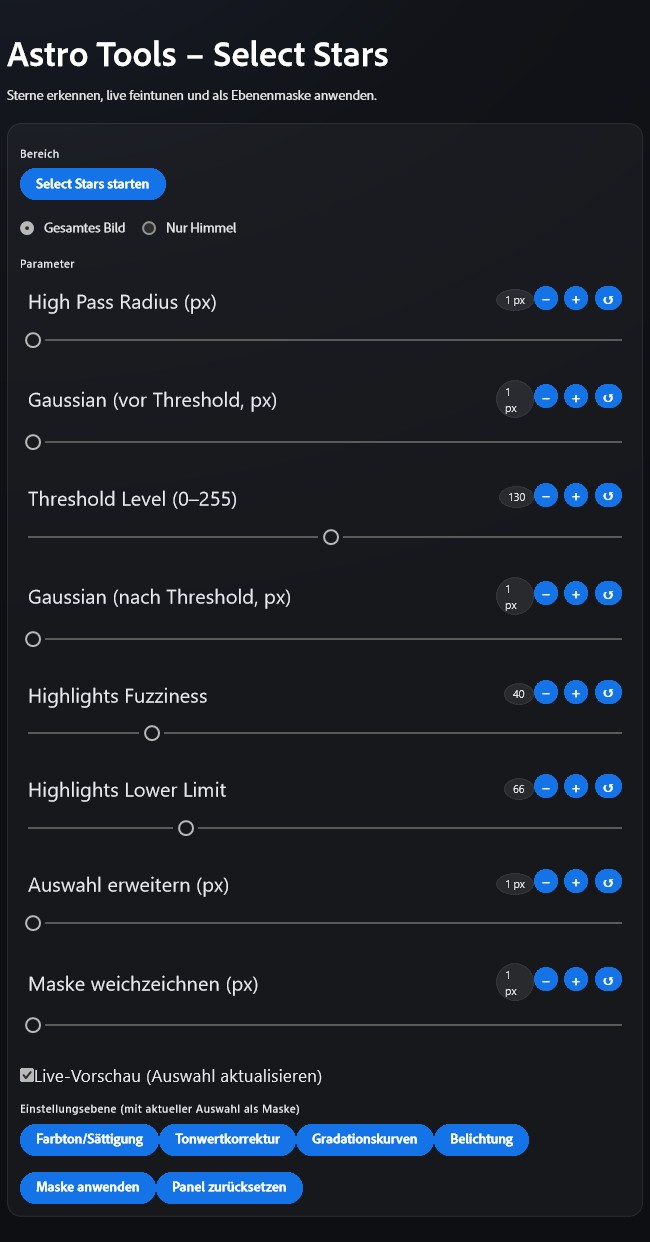
Instead of having one fixed action, I could now build a tool with sliders, input fields, presets and buttons. That was the real turning point.
Turning My Own Workflow Into Adjustable Tools
The biggest advantage of Astro Tools compared to my original action pack is control.
With actions, many values are fixed. With Astro Tools, the same basic workflow can be adjusted directly inside the panel. A star reduction tool can offer different settings. A glow effect can be fine-tuned. Contrast and color adjustments can be adapted to the image instead of being applied blindly.
This made the entire concept much more useful for real editing.
Astro Tools is not meant to replace creative decision-making. It is not a one-click editing solution that magically finishes an image. Instead, it is designed to simplify repetitive technical steps and make them more accessible, faster and easier to control.
That distinction is important to me.
In astrophotography processing, the best results still come from understanding the image and making careful decisions. But if a tool can prepare a clean layer structure, build a mask, apply a complex Photoshop workflow or create an effect that would otherwise take several manual steps, it can save a lot of time.
That is exactly where Astro Tools fits into my workflow.
Astro Tools is not meant to replace creative editing.
It is designed to make repetitive technical steps faster and more consistent, while keeping the final decisions inside Photoshop.
AI-Assisted Development and a Lot of Testing
Astro Tools was built with the help of modern AI-assisted coding workflows. I do not want to hide that, because it was an important part of how the project became possible.
But it is also important to be clear about what that means.
This was not a case of typing “build me an astrophotography plugin” and receiving a finished product. The real work was in the ideas, the testing, the debugging, the iterations and the practical image-processing decisions behind every tool.
The code had to match my actual Photoshop workflow. Every tool had to be tested with real astrophotography data. Many versions failed, behaved differently than expected, produced bad results or needed to be completely reworked. Especially with Photoshop automation, small details can make a huge difference.
AI helped me move faster, analyze problems and turn ideas into code, but the direction, testing and final decisions came from practical use in my own workflow.
That process became especially important later, when Astro Tools grew beyond simple Photoshop automation and started using custom code running alongside Photoshop.
The First Beta Versions
After the first prototypes became stable enough for my own use, I started testing Astro Tools with real images more seriously.
At that point, the plugin already felt more useful than my original action pack. It still used many of the same ideas, but the tools were easier to adjust, easier to repeat and much more comfortable to use.
Once I had enough tools integrated and the plugin worked reliably on my own system, I released the first beta version to my Patreon supporters. That was the first time other people could test Astro Tools in a more realistic environment.
The feedback was extremely helpful. Some things worked well immediately, while other parts needed clearer controls, better defaults or more predictable behavior.
Before the final release of version 1.0.0, I also ran a closed beta with a small group of friends and experienced astrophotographers, including names like Anthony Lopez and Mike Abramyan.
Their feedback helped me refine the plugin further and turn the early concept into a much more polished first release.

Astro Tools version 1.0.0 marked the first full release of the plugin after several prototype and beta stages.
Version 1.0.0
From prototype to first full release
Version 1.0.0 was the point where Astro Tools started to feel like a real product instead of an internal experiment.
It still carried many ideas from the original Photoshop Action Pack, but the workflow had become more adjustable, more comfortable and easier to use inside Photoshop.
The beta feedback helped refine the interface, improve defaults and make the tools more predictable for real astrophotography processing.
Why Astro Tools Became More Than an Action Pack
The original Photoshop Action Pack was mainly about speed. It helped automate steps that I used frequently.
Astro Tools is different. It is not just about running a fixed sequence faster. It is about turning a real astrophotography workflow into a more flexible editing system.
For example, instead of manually building the same kind of star reduction workflow again and again, I can now open the plugin, choose the tool, adjust the settings and apply it in a more controlled way. The same applies to glow effects, contrast work, basic adjustments, noise reduction and other processing steps.
This does not remove the creative part of editing. It removes some of the repetitive technical work around it.
That is the main reason Astro Tools fits so naturally into my own workflow: it was built from that workflow.
I did not create a generic tool first and then try to find a use for it. I started with the actual problems I had while processing my own images and built tools around them.
Reaching the Limits of Photoshop Automation
As Astro Tools developed further, I also started to understand the limitations of what can be done with Photoshop’s internal tools alone.
Photoshop is incredibly powerful, but when you try to build more advanced astrophotography-specific features, you eventually reach hard limits. Some things can be automated very well inside Photoshop. Other things require more specialized logic, custom processing or external code.
By the time Astro Tools reached version 1.1.1, I felt that the plugin had gone quite far with Photoshop-based automation. I could still add more tools, but some of the bigger ideas required a different approach.
I wanted to experiment with more advanced features: better star trail processing, registration-related tools, more specialized glow effects and eventually workflows that go beyond standard Photoshop filters.
That is where the next major step began.
Version 1.2.0
A major step beyond Photoshop automation
With version 1.2.0, Astro Tools took a much bigger step forward.
This version is important because Astro Tools is no longer only a collection of Photoshop-based workflows. It now also includes custom code that runs in the background alongside the Photoshop plugin.
That opens the door for more advanced tools and more specialized astrophotography features in the future.
Version 1.2.0 introduced custom code running alongside the Photoshop plugin and opened the door for more advanced astrophotography-specific workflows.
Custom background code
Astro Tools is no longer limited to Photoshop-only automation and can now use custom code alongside the plugin.
Advanced Star Trail mode
A new workflow designed to remove airplane and satellite trails from star trail images while preserving the real star trails as much as possible.
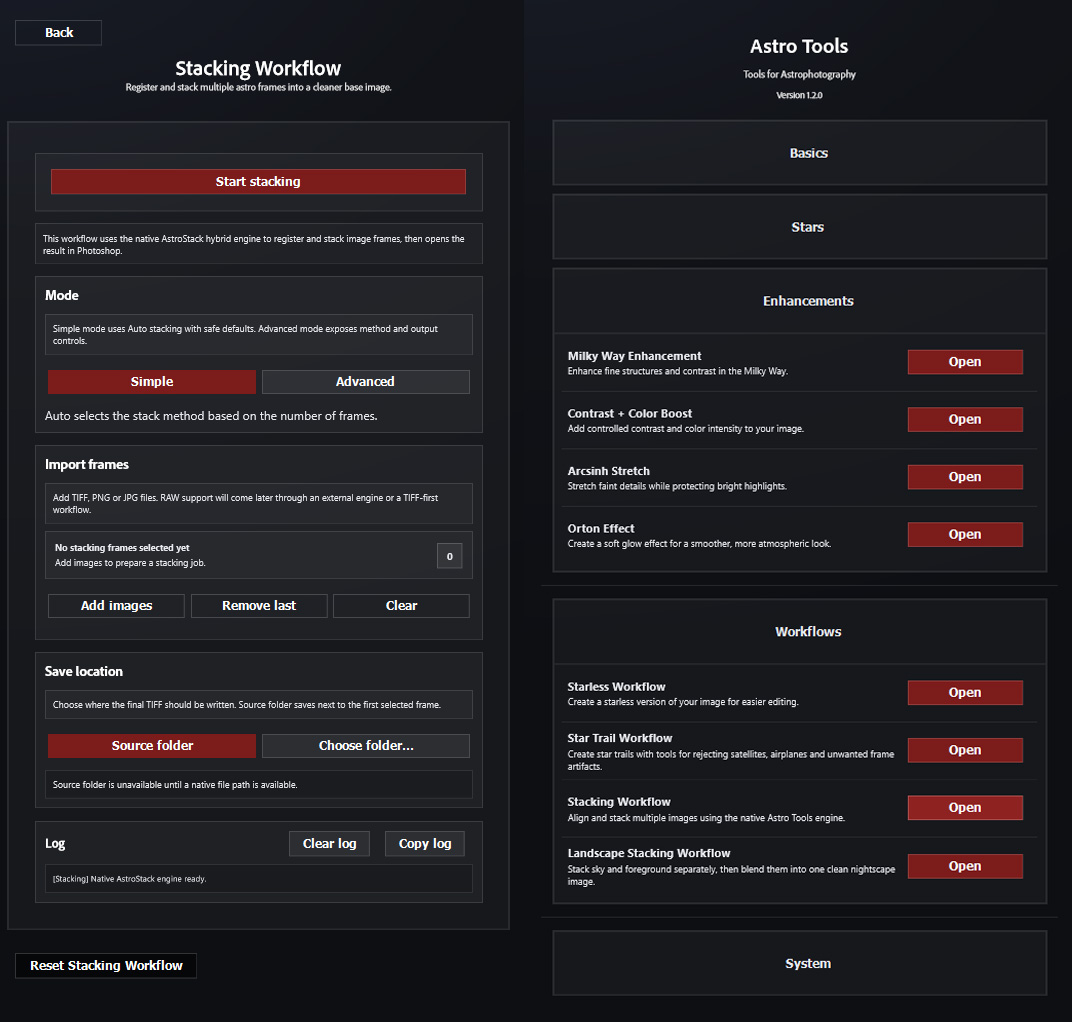
Stacking workflows inside Photoshop
Astro Tools brings dedicated stacking and landscape stacking workflows into Photoshop.
Foundation for future tools
The new technical structure makes more specialized astrophotography features possible in future versions.
Version 1.2.0 and Custom Code
With version 1.2.0, Astro Tools took a much bigger step forward.
For this version, I spent a huge amount of time testing, rebuilding and iterating. The development from version 1.1.1 to 1.2.0 alone took roughly 80 to 100 hours of work — mostly through trial and error, AI-assisted coding, debugging, testing, fixing and testing again.
This version is important because Astro Tools is no longer only a collection of Photoshop-based workflows. It now also includes custom code that runs in the background alongside the Photoshop plugin.
That opens the door for more advanced tools and more specialized astrophotography features in the future.
Advanced Star Trail Mode
A more practical way to clean up star trail images
One of the most important additions in Astro Tools 1.2.0 is new Star Trail mode. It was designed to simplify one of the most time-consuming parts of star trail processing: removing airplane and satellite trails while keeping the real star trails intact.
Instead of manually retouching dozens or even hundreds of frames, the workflow analyzes the image sequence and helps reject unwanted trails before the final star trail image is created.
The result still depends on the source material and the selected settings, but this feature marks a major step toward more advanced astrophotography-specific tools inside Astro Tools.
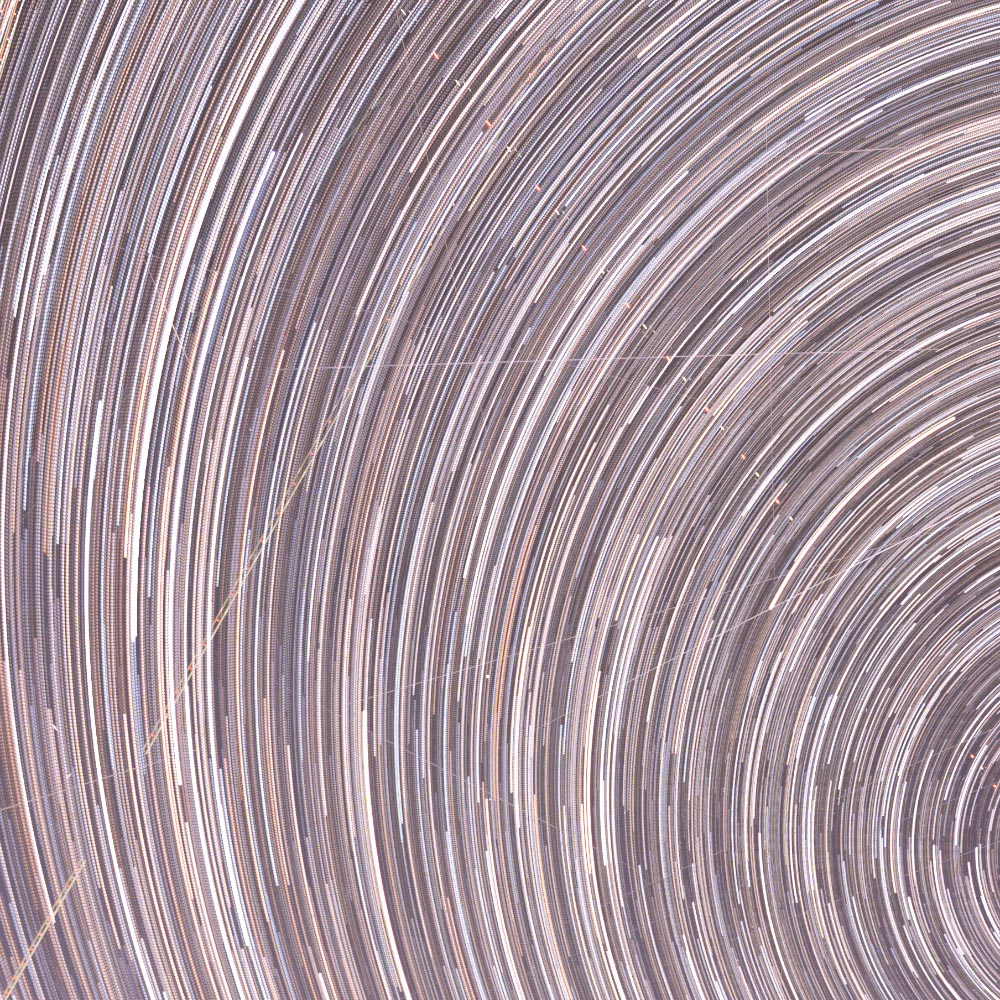
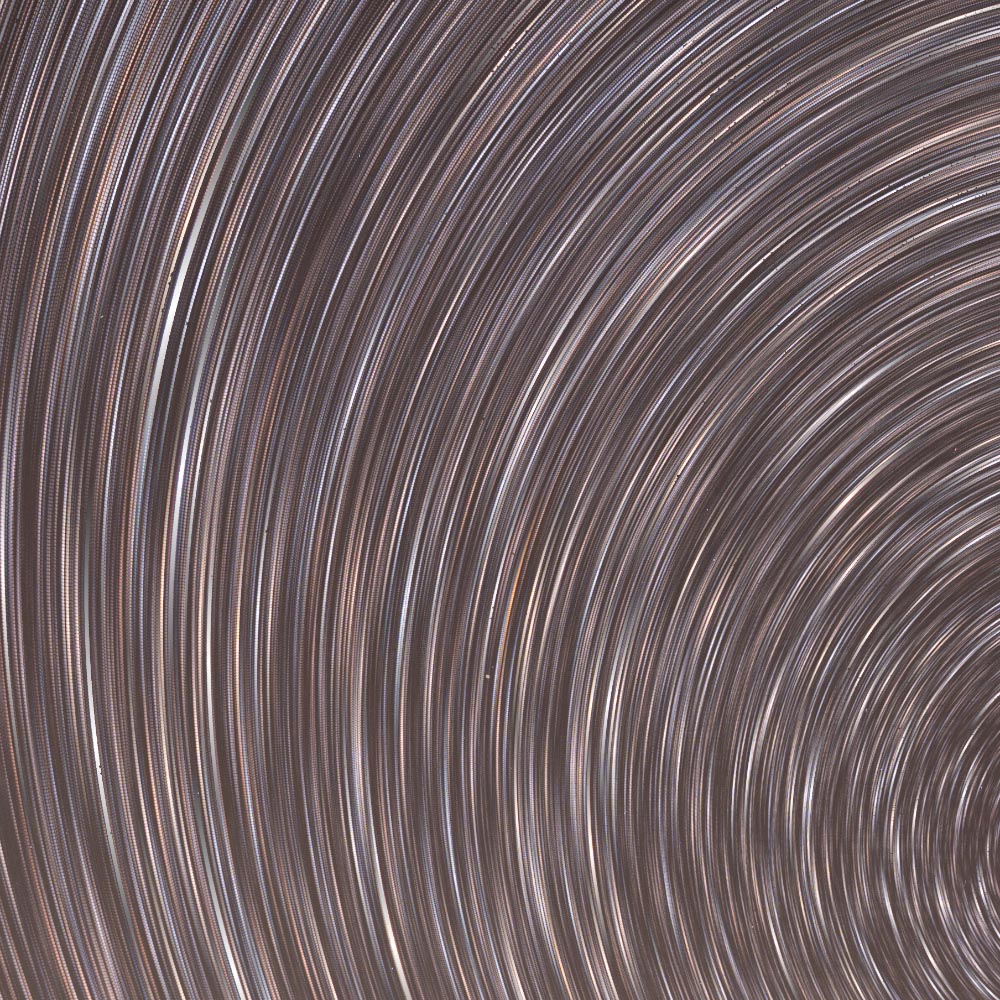
Before and after comparison using the new Star Trail mode in Astro Tools 1.2.0.
How Astro Tools Supports My Photoshop Workflow
In my own processing, Astro Tools sits between manual editing and full automation.
I still make the creative decisions myself. I still decide how strong an effect should be, which areas need adjustment, how the contrast should feel and how natural or dramatic the final image should become.
But Astro Tools helps with the repetitive parts.
It gives me a faster way to create common astrophotography adjustments, apply controlled effects and build workflows that would otherwise require many individual Photoshop steps. It also helps keep my editing more consistent, because I can start from a familiar structure and then adapt it to each image.
For Milky Way images, this can mean faster detail work, contrast adjustments, glow effects and star-related edits. For nightscapes, it can help separate sky and foreground workflows more clearly. For star trails, the newer tools can simplify cleanup steps that would normally be very time-consuming.
The goal is not to make every image look the same. The goal is to make the technical foundation faster, cleaner and easier to control.
The Long-Term Vision
Astro Tools is still evolving.
Right now, it is mainly used through Photoshop, because Photoshop is still the center of my own astrophotography editing workflow. But the long-term vision is bigger.
My goal is to eventually create a standalone version of Astro Tools while also keeping a Photoshop extension or plugin workflow available. Something similar to how tools like Topaz can work both as standalone applications and as Photoshop plugins.
That kind of structure would make Astro Tools much more flexible in the future. It could still integrate with layered Photoshop editing, but it could also handle more advanced processing outside of Photoshop when needed.
That is the direction I want to explore over time.
Why I Built Astro Tools
In the end, Astro Tools exists because I wanted a better version of my own workflow.
I wanted the speed of Photoshop actions, but with more control. I wanted tools that were based on real astrophotography editing problems, not generic image adjustments. I wanted to simplify the steps I repeat constantly, while still keeping the creative part of processing in my own hands.
What started as a small action pack slowly turned into a full Photoshop plugin. Then it grew into a more advanced toolset with custom code running behind it. And with version 1.2.0, Astro Tools feels like it has reached a new stage.
It is still built around the same original idea: make astrophotography processing faster, more flexible and more enjoyable.
For me, Astro Tools is not just a product. It is the result of turning years of personal Photoshop workflow into something more structured, more powerful and more accessible.
And this is only the beginning.

Astro Tools for Photoshop
Try it in your own workflow
Astro Tools is built for astrophotographers who want faster, more flexible and more controlled Photoshop workflows — without giving up the creative decisions that make every image unique.